While the main appeal of Helium currently is (rightly) the incentive to build out the network, we should also be interested to look at the use cases FOR the network as we need that to take off too to sustain growth. LoRaWAN sensors have been around for a good few years now, operating on independent, privately controlled LoRaWAN gateways. Many have since transitioned to The Things Network (TTN) or across to Helium. Here’s my attempt to get a couple onto Helium to do some mapping.
The Mapper Journey begins
While waiting the long wait for hotspots, I ordered a couple of GPS enabled LoRaWAN boards to turn into mappers. Mappers use the Helium network and, with the data they collect, develop a map of actual coverage provided by hotspots – from the mapper’s perspective. My goal was to get information recording to both Cargo and Mappers.
TL;DR – It works. Read about how things went here, and in this post, too!
The sensors I ordered were small Heltec CubeCell GPS ASR6502 boards complete with LoRaWAN chips, antenna, GPS, and OLED screen. I bought two from Aliexpress.

I’m very much a search, copy-paste kind of coder, so I was relieved to find this great guide which outlined most of the necessary steps, but there were a few small differences:
GitHub – jas-williams/CubeCell-Helium-Mapper
Note: there’s a reworked version of the guide and code (with some enhancements to the functionality) here.
There are two main parts to getting these kinds of boards working as Helium mappers.
- Registering the boards with the Helium Console
- Getting the customised software onto the boards
Registering the boards with the Helium Console
The Helium Console is the main management dashboard for all Helium devices. Accounts on the Console are free and come with 10,000 Data Credits (DC) to get you started. Subsequent Data Credits are purchased by burning Helium token (HNT). Data Credits credits are issued at an exchange rate of 1 Data Credit = USD$0.00001, so they’re pretty cheap when you use up your free allocation.
Signing up for an account is simple, and from the console, you need to setup a few things:
- Devices
- A Function
- Two Integrations – one for Mapper and one for Cargo
- A Flow
Devices
Adding a new device is easy. Give it a suitable device name – I recommend something unique that you will remember (avoid using generic things like Mapper1 since how you name it will be how you’ll find it in Cargo) – and add a label. The label name can be the same as the name you give to the device. Click Save Device and you’re done. You’ll return to the device a little later to grab some of its keys.
Functions
A Function is a little piece of code that will decode the telemetry information the Mapper sends to the Helium network and formats it to make it readable by the Integrations. There are a few drop downs to complete and some code to paste in. Then hit save. I named my decoder – Heltec Decoder.
Integrations
Integrations are the connections from the Helium Console to other tools, apps, services and so on. You can connect an Integration to your own apps, Google Sheets, or other web endpoint you can think of. You need to set up two here for the Helium mapping tools. One for Mapper, and one for Cargo. Cargo is a built in Integration, and doesn’t need much configuration other than a name. Mapper is a little more involved, but I do only mean a ‘little’. Set them both up per the guide and save them.
Flow
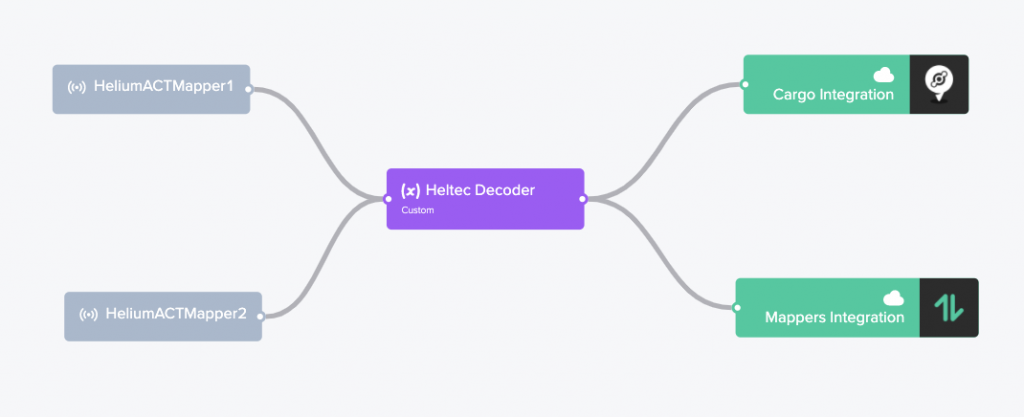
The final step is to set up the Flow. The Flow is how the Devices, connect to the Function, and on to the Integrations. It’s a visual drag and drop logical flow tool very similar to Node Red or Scratch (if your kids have used that). Here’s what mine looked liked after I’d finished wiring it all up:

With the Flow all wired together, you’ve configured the Console, now we need to get some software onto the boards.
Installing the customised Heltec CubeCell Helium Mapper software
I’m not gonna lie – this bit is fiddly. I’ve played in the home automation space for the last 7 or so years, building sensors with Arduino boards and ESP8266s etc so am no stranger to setting up and flashing devices using different tools. If you’ve never done this kind of thing before, while not impossible, it could be a bit of a steep learning curve, but a fun one regardless.
As usual, I’ll weasel my way out of providing a comprehensive how-to guide. 
The Heltec CubeCell GPS boards are compatible with the Arduino IDE. You will need to download and install that first. Next, you need to install a serial driver which can talk to the serial port on the CubeCell board via a micro-USB to USB A cable. The links to the driver software are indicated in the guide, and they are available for Mac or Windows.
With the Arduino IDE and drivers installed, you then need to add support for the Heltec CubeCell boards to the Arduino IDE – follow the steps using Board Manager.
Download the git repo hereOpen one of the sample sketches for the CubeCell boards. I used:
CubeCell_DIY_Mapper_V1.ino
With the code downloaded you need to adjust some of the parameters to make it work with the Helium Console and the device you set up earlier. This involves adding in a few keys so that when it connects to a Helium hotspot, it has some address information that the Console and then the Mapper and Cargo tools knows about.
With the changes made you can now flash the boards by setting the correct port, configuring a few other parameters (the guide explains all) and uploading the code. Cross your fingers and you should have a working Mapper.
Important Note! Not all Micro-USB to USB A cables are created equal! If your IDE doesn’t detect the CubeCell check again with another better quality Micro-USB cable. I’ve run into this problem many times before, assuming I had misconfigured something or installed the wrong drivers, when it was a bad cable all along. I highly recommend looking through all of your cables and testing them out until you find one that works before you assume the
It works!
I can confirm the guide works great and I’ve successfully done a few mapping excurstions to test things out.. I’ve mapped a few parts of Canberra as documented here and here. Here are the fruits of my labour.

UPDATE: I’m also testing out a variation of the JasWilliams code, modified by hkicko and available here:
GitHub – hkicko/CubeCell-GPS-Helium-Mapper
It’s got a menu and some other configurable options which I really like the look of. I’ve tested it too and it works great as well.
So…there’s a little overview of getting started with Mappers and Cargo using some Heltec CubeCell GPS ASR6502 boards. Do you have plans to do any mapping? You should! It’s fun! Leave a comment below if you have questions and good luck!


